Upgrade Your App to Angular 1.5 Components and Beyond!

This article was peer reviewed by Dan Prince and Michaela Lehr. Thanks to all of SitePoint’s peer reviewers for making SitePoint content the best it can be!
With each new release of AngularJS, the development team is trying to bridge the gap between AngularJS 1.x and 2. With the release of AngularJS 1.5, developers will be able to write applications structurally similar to AngularJS 2.0.
In this tutorial, we’re going to create a grid directive in AngularJS 1.4. We’ll then walk through the steps to upgrade it to 1.5, and afterwards look at how we could convert it to work with version 2.0.
Getting Started
Let’s start by creating a project directory called AngularMigrateApp. Within this folder, create an HTML page called index.html. Here is what the page should looks like:
<!DOCTYPE html>
<html lang="en" ng-app="myApp" class="no-js">
<head>
    <title>My AngularJS App</title>
    <link rel="stylesheet" href="https://maxcdn.bootstrapcdn.com/bootstrap/3.3.5/css/bootstrap.min.css">
</head>
<body>
    <script src="https://code.angularjs.org/1.4.10/angular.js"></script>
</body>
</html>
As well as the Angular framework, we’ll also make use of Bootstrap to design our directive layout. We’re including both of these files direct from CDNs.
Creating a Grid Directive
Let’s create a simple grid directive to display a JSON array. We’ll start by creating an AngularJS module.
angular.module('myApp', [])
    .constant('employees', [{
        firstName: 'Rima',
        lastName: 'George',
        location: 'San Francisco'
    }, {
        firstName: 'Shaun',
        lastName: 'John',
        location: 'Germany'
    }, {
        firstName: 'Rahul',
        lastName: 'Kurup',
        location: 'Bangalore'
    }, {
        firstName: 'Samson',
        lastName: 'Davis',
        location: 'Canada'
    }, {
        firstName: 'Shilpa',
        lastName: 'Agarwal',
        location: 'Noida'
    }])

    .controller('HomeCtrl', ['$scope', 'employees', function($scope, employees) {
        $scope.employees = employees;
    }])
We’ve defined a constant called employees that holds an array of example data. We then inject this array into HomeCtrl, and make it available on the controller’s scope.
Let’s create a directive called myGrid, which we’ll use to display the above JSON array.
.directive('myGrid', function() {
    return {
    }
})
We want to use the directive via a tag name, like this:
<my-grid></my-grid>
So, we’ll add the restrict option to specify that:
.directive('myGrid', function() {
    return {
        restrict: 'E'
    }
})
Next we want to pass the employees data from the view to the directive. So, we’ll add it as a binding:
.directive('myGrid', function() {
    return {
        restrict: 'E',
        scope: {
            info: '=info'
        }
    }
})
Now we’ll be able to pass the employees data to the directive as an attribute:
<my-grid info="employees"></my-grid>
Last but not least, we need an HTML template to display the data:
.directive('myGrid', function() {
    return {
        restrict: 'E',
        scope: {
            info: '=info'
        },
        templateUrl : '/directiveGrid.html'
    }
})
Add the following HTML template script in body of index.html.
<script type="text/ng-template" id="/directiveGrid.html">
    <div class="panel panel-primary">
        <div class="panel-heading">Site Point Directive Grid</div>
        <table class="table">
            <thead>
                <tr>
                    <th>FirstName</th>
                    <th>Last Name</th>
                    <th>Location</th>
                </tr>
            </thead>
            <tbody>
                <tr ng-repeat="employee in info">
                    <td>{{ employee.firstName }}</td>
                    <td>{{ employee.lastName }}</td>
                    <td>{{ employee.location }}</td>
                </tr>
            </tbody>
        </table>
    </div>
</script>
As you can see in the code above, we are iterating over the info property and displaying each of the items in the employees list.
Let’s use the myGrid directive inside index.html. Add the following code:
<div ng-controller="HomeCtrl">
    <my-grid info="employees"></my-grid>
</div>
We have specified the HomeCtrl controller and inside it used our directive. Save the changes and browse to the index.html page. Here is a demo of the data grid in action:
See the Pen AngularJS 1.4 Demo by SitePoint (@SitePoint) on CodePen.
Upgrading to 1.5
So far we’ve created an AngularJS directive using version 1.4 and it’s working pretty well. Now, let’s try to use the same code with AngularJS 1.5 and see if any thing breaks.
Let’s replace the existing script reference with a CDN link to version 1.5. If you try refreshing the page everything should continue to work fine. With this new release of the 1.x line, the framework is moving closer to the way AngularJS 2.0 will work, using components, and we can take advantage of this in our code making the eventual transition to version 2.0 easier.
In AngularJS 1.5, components are syntactical sugar for directives which take care of the defaults and have a simpler configuration. They should be favored as a replacement, especially for those wanting to upgrade in future.
When working with AngularJS, developers generally tend to work with controller-based approach, but this can create many problems as the application starts to grow. A controller and view based approach leads to repeated ng-controller/view, but a component-based approach solves the issue by creating components that can be composed into larger components without repeating the code.
Let’s try to make use of the new component directive helper method and modify our existing code. We’ll start by creating a component:
.component('myDataComp', {});
Unlike the directive method — which takes a function — the component method takes an object. We’ll pass the same objects that we had in our directive with a different template. Here is the HTML template:
<script type="text/ng-template" id="/componentGrid.html">
    <div class="panel panel-primary">
        <div class="panel-heading">Site Point Directive Grid</div>
        <table class="table">
            <thead>
                <tr>
                    <th>FirstName</th>
                    <th>Last Name</th>
                    <th>Location</th>
                </tr>
            </thead>
            <tbody>
                <tr ng-repeat="employee in info">
                    <td>{{ employee.firstName }}</td>
                    <td>{{ employee.lastName }}</td>
                    <td>{{ employee.location }}</td>
                </tr>
            </tbody>
        </table>
    </div>
</script>
Here is the modified component code:
.component('myComp', {
    restrict: 'E',
    scope: {
        info: '=info'
    },
    templateUrl : '/componentGrid.html'
});
As seen in the above code, we have passed all the options that we had in our old directive.
Create a component called myComp in the index.html page.
<div ng-controller="HomeCtrl">
    <my-grid info="employees"></my-grid>
    <my-comp info="employees"></my-comp>
</div>
Save the changes and refresh the page and you should be able to see that the data is not displayed but no error in the browser console either.
If we take a look at the comparison chart between the component and directive from the official site, we can see that scope is always isolate in components.
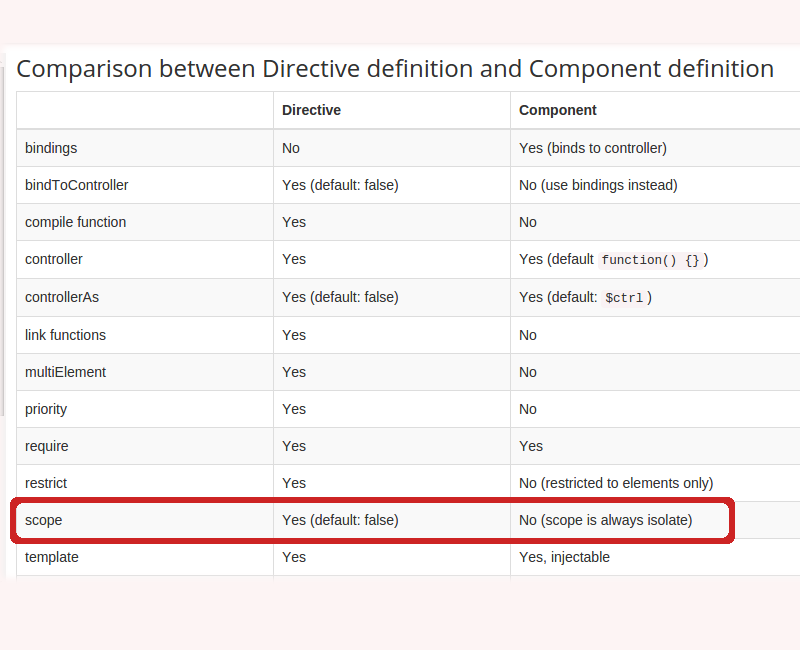
So, we need to make use of the bindings option to bind data to the controller. The restrict option is no longer required, as components are restricted to elements only.
Here is the modified code :
  .component('myComp', {
      bindings: {
          info: '=info'
      },
      templateUrl : '/componentGrid.html'
  });
The binding info will be bound to the controller. The default alias for the controller is $ctrl and inside the template we’ll use that to access the info property:
<script type="text/ng-template" id="/componentGrid.html">
    <div class="panel panel-primary">
        <div class="panel-heading">Site Point Component Grid</div>
        <table class="table">
            <thead>
                <tr>
                    <th>FirstName</th>
                    <th>Last Name</th>
                    <th>Location</th>
                </tr>
            </thead>
            <tbody>
                <tr ng-repeat="employee in $ctrl.info">
                    <td>{{ employee.firstName }}</td>
                    <td>{{ employee.lastName }}</td>
                    <td>{{ employee.location }}</td>
                </tr>
            </tbody>
        </table>
    </div>
</script>
Now if you refresh the page you should be able to view the data displayed using the myComp component.
See the Pen AngularJS 1.5 Demo by SitePoint (@SitePoint) on CodePen.
Upgrading to 2.0
Note : AngularJS 2.0 is still in beta. The version we are using is Angular2.0.0-beta.8.
Let’s replace the existing version of AngularJS in our app with a link to version 2.0 from the CDN and see if anything breaks:
<script src="https://code.angularjs.org/2.0.0-beta.8/angular2.js"></script>
After refreshing the page nothing shows up on the page and if we check the browser console we can see a couple of errors too.

As you can see, our component code didn’t work well with Angular 2.0!
Let’s start from the very scratch and see how the new version works, then we’ll try to port our component.
Whereas it’s possible to get started with Angular 1.x by including the framework with a single script tag, the situation with Angular 2.0 has changed. We need a couple of other libraries in order to function. While loading these separately via script tags is OK for development, they are intended to be bundled up as part of a build process for production.
If we take a look at the official quick start guide, we can see that we’ll need some other libraries and development dependencies to get started with 2.0.
Let’s create a folder called AngularJS2.0Component and create a package.json file as follows:
{
  "name": "angular2-quickstart",
  "version": "1.0.0",
  "scripts": {
    "start": "npm run lite",
    "lite": "lite-server"
  },
  "license": "ISC",
  "dependencies": {
    "bootstrap": "^3.3.6",
    "angular2": "2.0.0-beta.8",
    "es6-promise": "^3.0.2",
    "es6-shim": "^0.33.3",
    "reflect-metadata": "0.1.2",
    "rxjs": "5.0.0-beta.2",
    "zone.js": "0.5.15"
  },
  "devDependencies": {
    "concurrently": "^2.0.0",
    "lite-server": "^2.1.0"
  }
}
The above file shows all the dependencies required by AngularJS 2.0 application. Save the changes and install the required dependencies using npm:
npm install
Create a sub folder called app and inside create a file called app.component.js with the following code:
(function(app) {
    app.AppComponent =
        ng.core.Component({
            selector: 'my-comp',
            templateUrl: 'grid.html'
        })
        .Class({
            constructor: function() {
                this.employees = [{
                    firstName: 'Rima',
                    lastName: 'George',
                    location: 'San Francisco'
                }, {
                    firstName: 'Shaun',
                    lastName: 'John',
                    location: 'Germany'
                }, {
                    firstName: 'Rahul',
                    lastName: 'Kurup',
                    location: 'Bangalore'
                }, {
                    firstName: 'Samson',
                    lastName: 'Davis',
                    location: 'Canada'
                }, {
                    firstName: 'Shilpa',
                    lastName: 'Agarwal',
                    location: 'Noida'
                }];
            }
        });
})(window.app || (window.app = {}));
In the above code, we are using the Angular core namespace ng.core to create a component. We have defined a selector for our component as my-comp. We are using the same HTML, grid.html, as the template for our app. We have defined our employees object in the component’s constructor.
Create a file called main.js and paste in the following code:
(function(app) {
  document.addEventListener('DOMContentLoaded', function() {
    ng.platform.browser.bootstrap(app.AppComponent);
  });
})(window.app || (window.app = {}));
This tells Angular to load the component that we just created.
Next, create a file called index.html outside the app folder, and paste in the following code:
<html>
  <head>
    <title>Angular Component</title>
    <link rel="stylesheet" href="styles.css">
    <link rel="stylesheet" type="text/css" href="node_modules/bootstrap/dist/css/bootstrap.min.css">
    <!-- 1. Load libraries -->
    <!-- IE required polyfill -->
    <script src="node_modules/es6-shim/es6-shim.min.js"></script>
    <script src="node_modules/angular2/es6/dev/src/testing/shims_for_IE.js"></script>
    <script src="node_modules/angular2/bundles/angular2-polyfills.js"></script>
    <script src="node_modules/rxjs/bundles/Rx.umd.js"></script>
    <script src="node_modules/angular2/bundles/angular2-all.umd.js"></script>
    <!-- 2. Load our 'modules' -->
    <script src='app/app.component.js'></script>
    <script src='app/main.js'></script>
  </head>
  <!-- 3. Display the application -->
  <body>
    <my-comp>Loading...</my-comp>
  </body>
</html>
The above index.html page is the starter template for AngularJS 2.0 applications. We have included all the required dependencies, and within the body tag we have used our component.
Save the changes and start the server using npm start. This command runs a local development server called lite-server that loads index.html in a browser.
But still the data doesn’t show up!
In AngularJS 2.0 the syntax for looping is a bit different. Modify the looping portion in grid.html to as shown below :
<tr *ngFor="#employee of employees">
Save the changes and restart the server and you should be able to see the employees data displayed in the app.
Wrapping It Up
Components are a major part of AngularJS 2.0 and it would be right to say it’s component-based framework. With each new release of the 1.x line, we are moving closer to how applications are developed using version 2.0.
In this tutorial, we created an AngularJS directive using verison 1.4 of the framework. We the refactored the directive to take advantage of version 1.5’s component syntax. Finally, we upgraded it to work with Angular version 2.0.
For a more in-depth look at migrating your AngularJS apps, consider reading the official migration guide. Angular 2 code can also be written in TypeScript and Dart , and if you’re interested I would recommend reading the official guide to getting started with AngularJS 2 in TypeScript or Dart respectively.
Share your thoughts and suggestions in the comments below!


